Hewlett-Packard
LaserJet 5si, 8000
13
PAPER JAM
# 1: Check Paper Mechanisms
Check paper feed rollers, are they worn? If so, replace. Check paper
cassette and paper size selection. Remove cassette, check back of tray,
are there 4 plastic sensor levers? Any broken? If yes, replace.
# 2: Check Inside Of Printer
Open printer, remove toner cartridge, lift green handle towards the
inside of printer, next find #3 and lift up. Remove any paper you find
stuck inside printer.
# 3: Check Fuser Assembly
Turn power off, open back access door, and release blue locking clips
(one on each side). Carefully lift fuser up and slide out. Make sure the
sensor flag is not broken. If sensor flag is broken, check the paper
sensor inside printer for cracks. If paper sensor is cracked, replace.
# 4: Check The 2000 Optional Sheet Assembly TOP
Hewlett-Packard
LaserJet 5si, 8000
50
SERVICE ERROR
Fuser requires replacement. It is best to have
the complete assembly replaced if you receive a 50, 50.1, 50.2, 50.3,
50.4 service message. TOP
Hewlett-Packard
LaserJet 5si, 8000
79
SERVICE ERROR
This error message indicates a problem with
the main circuit board (formatter board).
# 1: Check Cables
First, turn power off. Next, check cable connection at the computer and
printer ends. Turn power on; if problem reoccurs check simms.
# 2: Check Simms
Remove memory, and/or language simms. Turn printer on; if problem
reoccurs check network cards.
# 3: Check Network Cards
Remove any network cards and turn printer on. If the problem reoccurs,
try running parallel if on a network. If that does not alleviate
problem, have a certified technician check formatter board.
# 4: Check Formatter Board (performed by certified technician)
If none of the previous suggestions eliminate the problem, the formatter
board must be replaced. Print a test page before you replace formatter
board, so you can reenter the page count on the new board. Unscrew thumb
screws that hold the formatter board. Remove formatter and replace. TOP
Hewlett-Packard
LaserJet 4si
IRREGULAR
PRINT
Any irregularities such as white streaking on
one side can be eliminated by removing the toner cartridge from your
printer and rocking it gently 5 or 6 times to evenly distribute toner.
Another option is to replace the toner cartridge. TOP
Hewlett-Packard
LaserJet 4si
LIGHT
PRINT
Use the green lever, located inside of the
printer on bottom left side, to increase print density by following the
diagram included with your toner cartridge.
Another option is to replace the toner cartridge. TOP
Hewlett-Packard
LaserJet 4, 4M, 4+
IRREGULAR
PRINT
Toner may be either low or not evenly
distributed when vertical white streaks appear. Remove toner cartridge
from your printer and rock it gently to evenly distribute toner,
repeating 5 or 6 times, or try a different toner cartridge.
Another option is to replace the toner cartridge. TOP
Hewlett-Packard
LaserJet 4, 4M, 4+
LIGHT
PRINT
Take printer off-line and press
"menu" key until "config menu" appears on printer
display. Press the "item" key 5 times until
"density" appears. The default setting is 3, however, print
can be darkened by pressing "+/-" key and then
"enter" to save desired setting. The darkest setting is 5 and
the lightest setting is 1.
Another option is to replace the toner cartridge. TOP
Hewlett-Packard
LaserJet II, IID, III, IIID
50
SERVICE ERROR
One of the most common failures of Canon
engine-based laser printers (i.e. Hewlett-Packard LaserJet II, IID, III,
IIID) is the code 50 service error message. While this message may only
appear during printer warm-up, it often indicates either fuser or AC
Power module failure.
These particular failures are very common in the spring months, given
the numerous electrical storms during that time of year. While 50
service error problems require only minor repairs, they present an
unnecessary expense. Fortunately, these problems can be avoided if the
following preventative steps are taken:
# 1: Use Surge Protectors
Electrical surges sent to the fuser or power module of your printer are
the primary cause of their failure. These failures can easily be
prevented by surge protectors.
While surge protectors are recommended by everyone, an alarming number
of people neglect this simple and inexpensive insurance policy.
Electrical storms during spring and summer increase your chance of being
zapped. Be sure all of your computer equipment, is properly protected by
approved surge protection equipment. This $20 investment could save
thousands.
# 2: Obtain Regular Professional Maintenance
Anyone can clean a laser printer, but printers need more than just
cleaning. Like your automobile, just washing it won't keep it running.
In fact, chances are, without regular professional maintenance you will
eventually end up stranded.
Effective printer maintenance consists of the removal and cleaning of
each individual part, including your fuser and power module, by a
trained professional. Thorough cleaning of all printer parts removes
dust and dirt build-up. Build-up of this type acts like corrosion on
your car battery. Just as neglecting to provide professional maintenance
to your car can bring it to a grinding halt, neglecting your printer can
cause it to stall with the infamous 50 service error.
# 3: Replace Your Ozone Filter Regularly
Laser printers using corona wire technology will always contain an ozone
filter for ozone and dust ventilation. Replacing your ozone filter at
least once a year will not only significantly reduce interior dust and
build-up of residual toner, but will help create proper air flow in your
printer.
# 4: Have Cooling Fans Checked
To ensure proper air flow in your printer, cooling fans must also be
working properly. These fans not only control the internal temperature
of your printer, but also create air flow through your equipment that
disposes of harmful build-up. Reliable service technicians generally
check cooling fans during routine printer maintenance. TOP
Hewlett-Packard
LaserJet II, IID, III, IIID
BACKGROUND
SHADING
Anyone with a Canon SX engine-based laser
printer (i.e. Hewlett-Packard LaserJet II, IID, III, IIID) eventually
encounters annoying and unpredictable background shading on envelopes,
labels and other heavy paper stock. Unfortunately, replacing imaging
components does not help.
The cause of the problem is static electricity. Laser printers of this
style work by using an electrostatic imaging process. Low humidity and
high static in printer environments greatly inhibits the ability of
equipment to work properly. The primary wire of your printer creates a
charge through the paper path to pull the toner image from your
cartridge photodrum to the surface of your page. When operating in a
high static environment or low humidity, the charge sent from this wire
gets scattered and spreads slightly causing a fine, background shade of
toner that ruins the appearance of your documents. While you may want to
acquire an office humidifier as a permanent solution to the problem, in
the meantime, here is a list of helpful hints to curb the appearance of
this annoying problem.
# 1: Clean Transfer Corona Wire
The transfer corona is located horizontally under the diagonal guide
wires in the middle of the printer interior. Clean this wire thoroughly
with Q-tips and alcohol.
# 2: Clean Anti-Static Teeth
The anti-static teeth are located on the transfer wire assembly on the
top back portion of the assembly. Use the brush side of the green tool
found inside your printer to remove debris from the small teeth tucked
into the tie unit.
# 3: Adjust Printer Density to 3
The green printer density dial is located just under the top cover in
top left corner of your printer. It is labeled with numbers 1-9. 1 is
the darkest setting, 9 is the lightest. Adjusting the dial to a lower
number will increase the voltage and discharge a more concentrated
charge to compensate for paper thickness.
An adjustment in RET (Resolution Enhancement Technology) setting may
also be needed. The RET setting can be adjusted through the control
panel on your printer. Take the printer off-line and hold down the
"menu" key until "configuration" appears on printer
display. Then press the "menu" key again and hold down until
"RET" appears. When "RET" appears, press the
"" key to change the setting to "light,"
"medium," or "dark." The factory default is
"medium." Try a darker setting and hit the "enter"
key to save the change.
# 4: Ground Printer Unit
You may use static or grounding pads obtained at your local computer
supply store to ground equipment. Doing so will help compensate for
environmental factors like low humidity due to heating systems or cold
weather. TOP
Hewlett-Packard
LaserJet II, IID, III, IIID
LIGHT
or UNEVEN PRINT
Open your printer and locate green dial on
left side of printer. Numerical dial can be turned to a lower number to
increase print density. You can also try removing your printer's toner
cartridge and rocking it side-to-side and shaking gently, parallel with
the floor, to evenly distribute toner.
Another option is to replace the toner cartridge. TOP
Hewlett-Packard
LaserJet II, IID, III, IIID
REPEATING
SPOTS
Clean corona wire inside the toner cartridge
using the green cleaning tool found inside your printer. Detailed
instructions with diagrams are included with your toner cartridge.
Another option is to replace the toner cartridge. TOP
Hewlett-Packard
LaserJet II, IID, III, IIID
STREAKING
Clean corona wire inside the toner cartridge
using the green cleaning tool found inside your printer. Detailed
instructions with diagrams are included with your toner cartridge.
Another option is to replace the toner cartridge. TOP
Hewlett-Packard
LaserJet IIP, IIP+, IIIP
LIGHT
PRINT
Try rocking your printer's toner cartridge and
adjusting print intensity. To adjust print density use the green lever
located inside of the printer just above the area where the toner
cartridge sits. Move lever to the right to increase print darkness.
Another option is to replace the toner cartridge. TOP
Hewlett-Packard
LaserJet IIP, IIP+, IIIP
REPETITIVE
LINES or DOTS
Print 5 copies of a document to determine if
line or dot appears consistently on each page. TOP
Hewlett-Packard
LaserJet IIISi
IRREGULAR
PRINT
Any irregularities such as white streaking on
one side can be eliminated by removing the toner cartridge from your
printer and rocking it gently 5 or 6 times to evenly distribute toner.
Another option is to replace the toner cartridge. TOP
Hewlett-Packard
LaserJet IIISi
LIGHT
PRINT
Use the green lever, located inside of the
printer on bottom left side, to increase print density by following the
diagram included with your toner cartridge.
Another option is to replace the toner cartridge. TOP
Hewlett-Packard
LaserJet IIISi
WHITE
STREAKING
Persistent white streaks that stripe your
printed documents are not only annoying, they mar your professional
appearance. This type of streaking can be caused by one of several
problems. The following checklist covers all the possible causes and
will help you diagnose which one is affecting your printer:
# 1: Faulty Fuser Assembly
To check for a faulty fuser assembly do the following. Open the clam
shell cover of the printer. In the back of the printer is the fuser
assembly unit. The green part of this unit on the back portion of the
fuser will open. Remember the fuser runs at an extremely high
temperature. Be sure you are touching felted portions of the unit only
to avoid burns. Gently push the green rear portion of the fuser unit
back. Turn the printer around and look through the back. Are there
visible streaks or rips in the upper fuser roller? Are there any visible
bubbles in the upper fixing roller?
If any of these symptoms are present you will need to replace the fuser
unit of the printer. Before you replace the unit take a page count off
the printer. Your SI model printers have required "user maintenance
kits" at every 200,000 page interval. If your page count is close
to one of these intervals you may choose to order an entire maintenance
kit since a fuser is included in the kit. Both replacement fusers and
user maintenance kits are available.
# 2: Cartridge Failure
To check for cartridge failure do the following. Send a page of print to
the printer. While the page is going through the printer, open the
printer in the middle of the print cycle while the paper is in the
printing section of the printer. Carefully remove the toner cartridge
from the printer and set it on a table upside down with the thinner
portion of the cartridge away from you. In the middle of the bottom of
the cartridge is a shutter that will pull back in your direction.
Carefully move the shutter back and look at the image placed on the
photo drum. Be careful not to touch the drum, oils in your skin will
ruin it. If the print is not placed properly on the drum you most likely
have a bad cartridge. Before you change the cartridge be sure that it is
the problem by eliminating the possibility of beam interruption. Or if
your resources provide it, trade cartridges with another SI printer and
see if the problem follows the suspect cartridge. In the case of
cartridge failure, replace the toner cartridge.
# 3: Beam Interruption
To check for beam interruption do the following. Remove the toner
cartridge from the machine. If printing labels, check to see if any
labels came loose in the printer. If so, remove the loose area of the
label. Test the cartridge again.
If the problem persists, remove the cartridge and open the printer at a
45 degree angle. Look at the top cover on the inside and you will see a
purplish mirror. Are there any foreign objects: screws, paper clips,
paper scraps, etc. lodged in the area?
If so, gently remove the obstruction or arrange for a technician to
remove it for you. Be careful not to nick or scratch the mirror, this
could make your problem far more serious. Send a page of print to the
printer to determine if you have solved the problem.
NOTE: If none of the above measures solves your problem, try replacing
the toner cartridge. TOP
Hewlett-Packard
LaserJet IIISi
ECHOED
IMAGES
Echoed images can ruin the appearance of your
printed documents. Echoed images can be caused by one of several
problems. The following checklist covers all the possible causes and
will help you diagnose which one is affecting your printer:
# 1: Printer Density Setting
The solution to your problem may be as simple as changing your printer's
density setting. To change the setting, open the cover of the printer.
Inside the printer towards its center is a black metal plate just behind
the transfer roller. On the left side is a sliding green knob with an
upside down arrow.
If the knob is set too high, the printer may be printing too dark. This
may be preventing the printer from transferring the full amount of toner
off the drum, resulting in an echoed image. Lower the setting and send a
page of print to the printer to determine if you have solved the
problem. If lowering the printer density setting has no effect or if
print quality at this setting is unsatisfactory, trade cartridges with
another SI series printer and see if the problem follows the suspect
cartridge. If so, replace the toner cartridge.
# 2: Faulty Fuser Assembly
To check for a faulty fuser assembly do the following. Open the clam
shell cover of the printer. In the back of the printer is the fuser
assembly unit. The green part of this unit on the back portion of the
fuser will open.
Remember the fuser runs at an extremely high temperature. Be sure you
are touching felted portions of the unit only to avoid burns. Gently
push the green rear portion of the fuser unit back. Turn the printer
around and look through the back. Are there visible streaks or rips in
the upper fuser roller? Are there any visible bubbles in the upper
fixing roller? If any of these symptoms are present you will need to
replace the fuser unit of the printer. Before you replace the unit take
a page count off the printer. Your SI model printers have required
"user maintenance kits" at every 200,000 page interval. If
your page count is close to one of these intervals you may choose to
order an entire maintenance kit since a fuser is included in the kit.
Both replacement fusers and user maintenance kits are available.
# 3: Paper Stock
Laser paper of certain stocks, even high-end quality paper stocks, carry
a fine coat of wax. Paper with this coating often cannot handle the
extreme heat of the fuser assembly in spite of their "Laser
Paper" label.
Paper stock for use in your SI printer needs to withstand 310 degrees
for one tenth of a second or it will leave troublesome build-up on your
fuser. Try a different paper stock and print a test document of about 20
pages. The problem may dissipate. TOP
Hewlett-Packard
LaserJet IIISi
BLOTCHES
Blotchy pages are generally caused by faulty
toner cartridges dropping excessive toner. This is easily checked by
simply opening the printer and looking for loose deposits of toner on
the printer interior.
Our technicians our happy to assist in the removal and cleaning of toner
from any of your equipment at our normal low service rates.
Bubble type blotches can also be caused by a defective cartridge. You
can test for this problem by trading cartridges with another and seeing
if the problem follows the suspect cartridge. TOP
Lexmark
4039, 4049
PAPER
JAMS in FUSER AREA
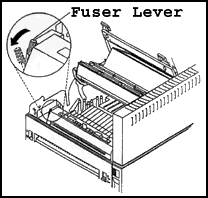
Pull printer. s fuser lever forward and hold. Remove
paper from fuser area. TOP
Lexmark
4039, 4049
PAPER
JAMS in PAPER ENTRY AREA
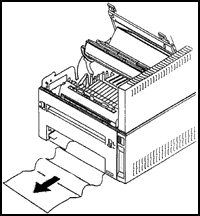
Remove paper tray. If you have the Duplex Option, do
not remove the duplex unit. Pull the paper out toward the front of the
printer. Remove any bits of paper that may remain. TOP
|